Here we are a couple of weekends later and most of the roadbed surfaces are now in place. Additionally, I've completed the basic construction of the backdrop divider that separates the passenger station scene from the freight yard scene.
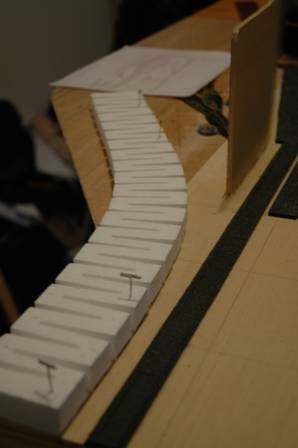
To the left you can see an earlier step where I used the flexible foam riser to help sight the mainline transition into the passenger section of the module. I aligned the edge of the foam with the straight entry to the module and pinned it in place. Then I flexed and pinned the foam along the straight path of the first turnout, adjusting its position to get a curve along the general path that I had planned. Finally, I gently lift and wiggle the foam in the middle to allow it to adjust to its natural resting position followed by sketching in the line along the foam edge.
The result is a transition curve with some gentle easement entry/exit transitions near the straight portions. Its effect really quite subtle given the scale but upon close inspection it seems to accomplish the easements without having to draw them out on the surface using the line and radius offset approach.

To the right is an overall view of the module. Here you can readily see how the divider will provide visual separation between the two main scenes. The divider is only 6" tall (110 scale feet:o) but given that the base level of the layout is 50" above the floor, this relatively low divider is still reasonably effective when viewing the module. On the passenger side you can certainly rise up on your toes to see the yard on the other side (or if you are very tall, you'll certainly see portions of the yard) but hopefully the observer will not focus on that. From the freight yard side you can't readily see the passenger side at all given the divider is set way back in the module (from that side). BTW, the divider is made from the same surface material as was used for the module and the module sides, that being 3/16" luaun panels. To get the bends in the panel material, for the divider as well as for the module sides, I make a series of shallow cuts in the panel on the surface side which is to the inside of bend. This makes it easy to flex through the curve although it obviously doesn't leave a smooth surface where the cuts are. For the module side panels, these cuts are covered up to that they aren't seen anyway, for the divider, I'll simply fill the cuts to smooth out the surface before painting or covering it to create the backdrop scene.

The roadbed is generally complete with the exception of a pair of sidings in the middle that I've not got final placement on. If it seems like there is more roadbed than what you would expect, let me first point out that I can cut out any excess after laying the track in place as it cuts and peels off the wood base quite easily. I secured the roadbed with craft tacky glue. That said, I do however plan to keep the roadbed as a solid surface throughout most of the siding areas as usually in such areas the ballasting is much lighter and distributed evenly unlike the elevated profile of the mainlines. On the passenger station side, I actually have to add the usual platforms and I'm expecting to simply install them over the roadbed between the tracks although I will likely cut out some portions (and even through the module surface) to model the passenger underpass tunnels for getting to each of the lines from the station.
At this stage I'm anxiously waiting the delivery of my first set of turnouts from Peter (they've been shipped, yeah!) so that I can proceed toward laying some of the track. Meanwhile, I've still got some prep work to do regarding the control panel which will fill the gap visible in this photo just to the right of the inside mainline.